[]
![]()
![]()
![]()
![]()
Getting the source for de basic skeleton of the mod is the easy part. If you haven't installed the Source SDK please do so now. Before you start toying around with the Source SDK make sure you started Half-Life 2 and Half-Life 2 Death Match first.
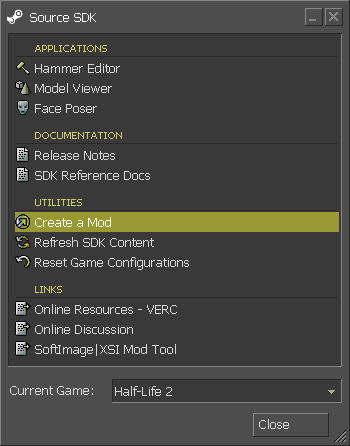
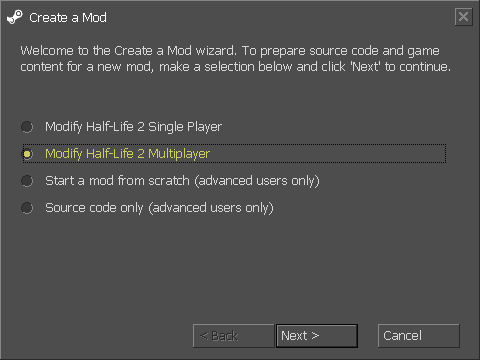
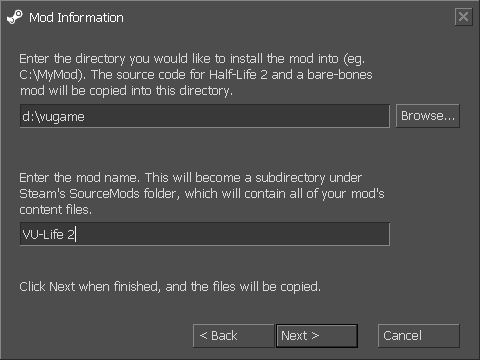
Start the Source SDK and choose Create a mod from the Utilities section. Choose Modify Half-Life 2 Multiplayer (You could choose any of these but we used Half-Life 2 Multiplayer to make our mod). Continue all the way with the values you want to choose, e.g. where you would want to save the source of your mod, the name of your mod etc.
Check if you can compile the source code of your basic source mod with Microsoft Visual Studio .Net 2003. First of all open the game_sdk solution from the directory where you saved the source for your mod. Next choose from the build menu the batch build. Deselect the Debug HL2MP for the client and hl projects and select the Release HL2MP for the client and hl projects. Click on build, wait a while for everything to compile and try running it.
So everything worked out? Ok, now its time for the real modding to begin. There are a few things you need to know before you start to mod. The source code is compiled to
From step 4 you are on your own. You will have to think of some extra's that could enrich the game or the game experience. I will go into further detail on how to make panels and how to integrate them into your HUD (Heads-Up-Display).
For this chapter I will discuss the VGUI class. With this class you can make panels on your screen. The HUD of HL2:DM is composed of these kind of panels. These panels can hold some information you might want.
The VGUI2 library (vgui2.dll) is a proprietary graphic user interface (GUI) provided by the Source Engine. All Source & Steam applications use VGUI for displaying windows, dialogs or menus. The object architecture is hierarchical and all implemented elements drive from VGUI base classes. The keyboard & mouse input system is event driven and quite similar to other GUI libraries (like Java Swing or .NET forms). Implementations for the most common GUI elements like buttons, text fields or images are provided by the VGUI controls library (vgui_controls.lib). Besides drawing GUI elements and processing input, VGUI also handles localization for displaying text in the preferred user language. All VGUI base interface headers are located in \public\vgui control elements are defined in \public\vgui_controls\.
As a mod author you will most likely use VGUI in the client.dll project to show menus, HUD elements or for in-game displays (on weapons or computer terminals etc). The base class all VGUI elements derive from is vgui::Panel, which defines an area on your screen that has a specific size and position, can draw itself and process input events. Dialog windows, text fields and buttons are all VGUI panels in a hierarchical parent-child relationship. The very first panel is the root panel and is provided by the Source engine. The client root panel covers the whole screen, but doesn't show anything. Even though you could use the client root panel, most client panels use the shared BaseViewport panel as parent ( g_pClientMode->GetViewport() ).
This diagram shows a part of the client panel hierarchy. An arrow between two panels means "is parent of" :
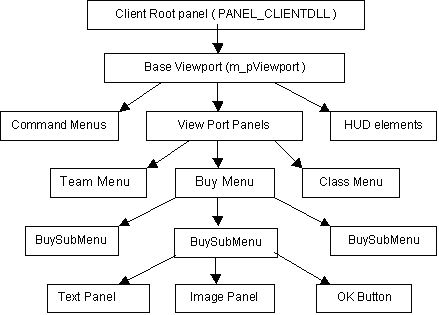
VGUI client panel hierarchy
To browse through the VGUI panel hierarchy during runtime, you can open the VGUI Hierarchy tool by executing in developer console vgui_drawtree 1. All panels are listed in an expandable tree view.

VGUI Hierarchy tool
Panels name are colored:
| white | Panel is visible |
| grey | Panel is hidden |
| yellow | Popup panel (Frame) |
| green | Panel has focus |
The following options are available:
| Show Visible | list all visible panels. |
| Show Hidden | list all hidden panels. |
| Popups only | list only Popup panels (Frames). |
| Highlight Mouse Over | Panels are highlighted with a colored border when you move the mouse cursor over. The panel tree will be expanded to show the current panel. |
| Freeze | Locks current tree view. |
| Show Addresses | shows panel memory address. |
| Show Alpha | show panel alpha value, 0 = translucent, 255 = opaque. |
| In Render Order | sort panels in tree by rendering order. |
The VGUI class Panel is the base class for over 50 different control elements, which are defined in \public\vgui_controls\. The header files usually provide a good documentation about the control features and behaviors. The following diagram shows the class hierarchy for some common used elements:
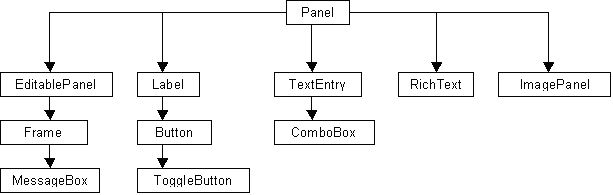
Since all VGUI classes derive from class Panel, we should take a closer look at the essential member functions and properties.
The most commonly used constructor to create a panel is Panel(Panel *parent, const char *panelName), since each panel needs a parent panel it belongs to and a unique name in its hierarchy level. Once a panel is created you can make it visible or hide it again with SetVisible(bool state).
VGUI keeps a handle for each new panel, which is used to globally address a panel without passing pointers. Lots of event messaging functions use these VPANEL handles to identify source and target panels. To get the unique VPANEL handle of a panel call GetVPanel().
To set a panel's position and size use the SetPos(int x,int y) and SetSize(int wide,int tall) member functions. The size is always in pixels and doesn't scale automatically with increasing screen resolutions. The position is always relative to the given parent panel, where (0,0) is the upper left corner.
To iterate through the panel hierarchy using a certain panel as starting point, you get the parent panel by calling GetParent() or GetVParent() to get the corresponding VPANEL handle. Of course a panel can have only one parent panel, but multiple child panels (sub panels, buttons, list elements etc). GetChildCount() will return the total number of children, were each child can be queried with GetChild(int index).
If a panel should react to input events like key pressed or mouse click, the virtual OnEvent() functions like OnMousePressed(MouseCode code) or OnKeyCodePressed(KeyCode code) must be overwritten. Mouse and keyboard input events can be enabled/disabled for a panel using SetMouseInputEnabled(bool state) or SetKeyBoardInputEnabled(bool state).
Another useful virtual function to overwrite is OnThink() which is called every time the panel is redrawn. Sometimes this is too much and you want update or check the panel state less often. Then you can hook into OnTick() which is called frequently in an adjustable time interval. But VGUI must be told that it should call OnTick() for a given panel and how often, this is done with ivgui()->AddTickSignal(VPANEL panel, int intervalMilliseconds).
A Panel as described above is always a 100% sub area of its parent panel, its position is always a fixed relative offset and can only be changed by code. Also, it draws itself only inside the parent region: if you move a VGUI element outside the parent panel, it will be clipped. This is fine for adding control elements, images or text fields to a panel, but wouldn't allow independent pop-up windows or dialog boxes the user can move around, resize and minimize. Therefore VGUI panels have the MakePopup() function which decouples a panel from is parent rendering and makes it a new, independent window. Still it belongs to a parent panel and becomes invisible if the parent does.
In most cases you won't call MakePopup() by yourself but use the Frame class instead. The Frame class encapsulates all common GUI windows features like title bar, system menu (close, minimize, maximize), dragging, resizing, focus and layout management.
Here a short example how to open a frame and activate it. Note that the frame will delete itself once the user closes the frame or the Close() function is called (just make sure that your stuff is cleaned up in the destructor).
Frame *pFrame = new Frame( g_pClientMode->GetViewport(), "MyFrame" );

pFrame->SetScheme("ClientScheme.res");

pFrame->SetSize( 100, 100 );

pFrame->SetTitle("My First Frame", true );

pFrame->Activate();	// set visible, move to front, request focus
If a Frame is resized, the virtual function PerformLayout() is called so the frame can rearrange its elements to fit best for the new size. The current Frame position and size can also be locked with SetMoveable(bool state) and SetSizeable(bool state).
VGUI panels communicate via a message system to signal state changes or events to parents or children (or any other panel). Messages are not sent directly (e.g. by calling a panel listener function), rather they are handed over to VGUI which delivers them to the target panel. Thus beside the message content, a sender and a receiver panel must be specified as VPANEL handles. VGUI sends event messages to inform panels about changes or events (mouse moved, input focus changed etc).
The message name and content is specified using a KeyValues object (\public\KeyValues.h). The KeyValues class is a very generic and flexible structure to store data records containing strings, integer or float numbers. A KeyValues object has a name and a set of data entries. Each entry has a unique key name and corresponding value. KeyValues also allow creating hierarchical structures using sub keys, though most VGUI messages are flat data records. KeyValues don't have data/type definitions or similar, so you can add or remove entries of any type as you like. Thus sender and receiver must both know the internal structure (e.g. key names, types and their meaning) of a KeyValues message object to communicate successfully. Here some sample code how to use KeyValues in general:
// create a new KeyValues Object named "MyName"

KeyValues *data = new KeyValues("MyName");


// add data entries

data->SetInt( "aInteger", 42 );

data->SetString( "aString", "Marvin" );


// read data entries

int x = data->GetInt("aInteger");

Con_Printf( data->GetString("aString") );


// destroy KeyValues object again, free data records

data->deleteThis();
To send a message you can call the Panel member function PostMessage(�) or directly ivgui()-> PostMessage(�). The name of the KeyValues object is also the message name used for later dispatching. VGUI will call the target panel's OnMessage(�) function, which will dispatch the message to a previous defined message handler. A panel can register new message handlers with one of the MESSAGE_FUNC_* macros, which adds a handler function to the message map. Never overwrite OnMessage(�) to handle new messages, always use a macro.
First declare a message handler for the receiving panel:
class MyParentPanel  : public vgui::Panel
{
	...
private:
	MESSAGE_FUNC_PARAMS( OnMyMessage, "MyMessage", data );
}

void MyParentPanel::OnMyMessage (KeyValues *data)
{
	const char *text = data->GetString("text");
}
The sending panel creates a KeyValues object, adds message parameters and sends the message (to its parent in this case). The KeyValues object is destroyed by VGUI after it has been processed.
void MyChildPanel::SomethingHappend()
{
	if ( GetVParent() )
	{
		KeyValues *msg = new KeyValues("MyMessage");
		msg->SetString("text", "Something happend");
		PostMessage(GetVParent(), msg);
	}
}
Using PostMessage() the sending panel must address a single, specific target, which means that all other panels interested in a state change must be known and addressed individually. To avoid hard coding these dependencies, panels have a public event system called action signals. A panel fires generic events with PostActionSignal(KeyValues *message) and interested panels can register as listeners for these signals with AddActionSignalTarget(Panel *target). These action signals are widely used by VGUI controls, for example messages like "TextChanged" fired by class TextEntry or "ItemSelected" used by class ListPanel. All action signal messages contain a pointer entry "panel" that points to the sending panel.
The example from above using action signals would need the parent panel to register as a listener, preferably in the constructor after the child panel has been created. The child panel just uses PostActionSignal() instead of PostMessage():
MyParentPanel::MyParentPanel()
{
	...
	m_pChildPanel->AddActionSignalTarget( this );
}

void MyParentPanel::OnMyMessage (KeyValues *data)
{
	const char *text = data->GetString("text");
	Panel *pSender = (Panel *) kv->GetPtr("panel", NULL);
}

void MyChildPanel::SomethingHappend()
{
	KeyValues *msg = new KeyValues("MyMessage");
	msg->SetString("text", "Something happend");
	PostActionSignal ( msg );
}
A commonly used action signal is the "Command" message, since no message handler needs to be installed. Panels just need to derive the virtual Panel function OnCommand(const char *command) and check for the correct command string. The "Command" message is used by all Button classes and is fired whenever the button is pressed. Here the example from above using the Command message:
class MyParentPanel  : public vgui::Panel
{
	...
protected:
	virtual void OnCommand(const char *command);
}

MyParentPanel::MyParentPanel()
{
	...
	m_pChildPanel->AddActionSignalTarget( this );
}


void MyParentPanel::OnCommand(const char *command)
{
	if (!stricmp(command, "SomethingHappend "))
	{
		DoSomething ();
	}
	else
	{
		BaseClass::OnCommand(command);
	}
}

void MyChildPanel::SomethingHappend()
{
	KeyValues *msg = new KeyValues("Command");
	msg->SetString("command", "SomethingHappend");
	PostActionSignal ( msg );
}
A VGUI scheme defines the general "look & feel" of your panels by specifying used colors, fonts & icons of control elements. Schemes are defined in resource files, for example hl2\resource\clientscheme.res. A new panel inherits by default the scheme settings used by its parent. The VGUI scheme manager can load a new scheme with LoadSchemeFromFile(char *fileName, char *tag) which returns HScheme handle.
To make a panel using a loaded VGUI scheme call the panel member function SetScheme(HScheme scheme).
Schemes set the general look of panel elements, but they don't arrange specific control elements of your panel. One way of adding elements to your panel is by doing that in source code. You can create them (usually in the constructor of the parent panel) and set properties like size and position manually using the panel member functions. This will become quite complex and time-consuming for larger dialogs with lots of control elements.
The most common way to define the layout of your panel elements is to describe all elements in an external resource file like hl2\resource\UI\classmenu.res (a KeyValues text file). When the parent panel is created, this file is loaded and executed with LoadControlSettings(char *dialogResourceName). Do note, however, that this function is only defined for EditablePanel (or an EditablePanel derivative such as Frame).
In this resource file each control element is defined in a separate section. A typical control definition looks like this:
"MyControlName"
{
	"ControlName"	"Label"		// control class
	"fieldName"	"MyControlName"	// name of the control element
	"xpos"		"8"		// x position
	"ypos"		"72"		// y position
	"wide"		"160"		// width in pixels
	"tall"		"24"		// height in pixels
	"visible"	"1"		// it's visible
	"enabled"	"1"		// and enabled
	"labelText"	"Hello world"	// show this text
	"textAlignment"	"west"		// right text alignment
}
Each control property has a key name and a value. Properties defined by the base class Panel are available for all controls (like xpos, ypos, wide, tall etc). A list of all available key names is returned by the panel member function GetDescription(). Derived panel classes may add new fields for their specific properties. Processing these new fields must be handled by overwriting the virtual function ApplySettings(KeyValues *inResourceData). Here you can also lookup how values for an existing control property are interpreted.

VGUI Build Mode panel
An even simpler way to edit panel and control layouts is the VGUI Build Mode. This allows you to modify and save the layout of a panel resource file while the application is running. To edit a panel, just start the game and open this panel, so it gets the input focus. Then press SHIFT+CTRL+ALT+B to open the VGUI Build Mode editor. In Build Mode you can easily rearrange existing elements and change their control properties (press 'Apply' to update changes). To add a new control element, just choose the desired class from the combo-box on the lower right side and an empty control object of that class will be place in your panel for further editing. To save the current layout in the associated resource file press the 'Save' button (make sure the resource file is not write-protected).
Using schemes and control properties you can change the general appearance and layout of existing controls, but it doesn't allow you to create completely new elements. To change the appearance of a panel you have to override the two virtual functions Panel::Paint() and Panel::PaintBackground(). In these functions you can use drawing functions provided by the ISurface interface to place lines, rectangles, text, images etc. When updating the screen, VGUI calls first PaintBackground() and then Paint() for each panel and its children panels recursively. Drawing coordinates are relative to the panel you draw in. Here same example code how to draw a red box in the upper left corner:
void MyPanel::Paint(void)
{
	BaseClass::Paint();
	surface()->DrawSetColor(  255, 0, 0, 255 ); //RGBA
	surface()->DrawFilledRect( 0, 0, 20, 20 ); //x0,y0,x1,y1
}
To draw text on a panel surface you need to set the used font first. Fonts have names like "DefaultSmall" and their properties like True-Type-Font, size and weight are defined in scheme resource files. The font handle can be retrieved by calling GetFont("Name") of the current panel scheme, then the surface can be told to use it as the current font. After setting the color and position for the next text output, the text itself must be passed as wide char string (Unicode) to DrawPrintText(�). This text will not be printed as it is and not localized anymore, so localization tokens must be translated beforehand.
void MyPanel::Paint(void)
{
	wchar_t *pText = L"Hello world!";	// wide char text

	// get the right font handle for this scheme
	vgui::IScheme *pScheme = vgui::scheme()->GetIScheme(GetScheme());
	vgui::HFont hFont = pScheme->GetFont( "DefaultSmall" );

	surface()->DrawSetTextFont( hFont ); // set the font
	surface()->DrawSetTextColor( 255, 0, 0, 255 ); // full red
	surface()->DrawSetTextPos( 10, 10 ); // x,y position
	surface()->DrawPrintText( pText, wcslen(pText) ); // print text
}
To draw a texture or image, VGUI has to load the texture from disk once (panel constructor) and generate a corresponding texture ID. This texture ID is then used as reference when drawing the texture. Here an example how to load and draw the texture "\materials\your_folder\mylogo.vmt":
MyPanel::MyPanel(void)
{
	//Do _not_ forget CreateNewTextureID(), it gave me a headache for a week
	m_nTextureID = vgui::surface()->CreateNewTextureID();
	vgui::surface()->DrawSetTextureFile( m_nTextureID, "materials/your_folder/mylogo" , true, false);
}

void MyPanel::Paint(void)
{
	vgui::surface()->DrawSetTexture( m_nTextureID );
	vgui::surface()->DrawTexturedRect( 0, 0, 100, 100 );
}
Coordinate values that you specify in configuration files are relative to an 800x600 resolution. These values will be scaled to the correct size no matter what the user's current resolution may be. For example, a "tall" value of 100 will always mean the panel takes up 1/6th the height of the screen, and an "x" value of 400 means that the panel's left edge will always be centered.
However, sometimes you will need to calculate coordinates for custom painting and forgo the luxury of configuration files. The problem is that values that you specify in code are relative to the user's native resolution, which may or may not be the same as the current game resolution (thus rendering surface()->GetScreenSize() useless). The solution to this problem is to use scheme()->GetProportionalScaledValue(). This allows you to specify a normalized coordinate relative to the 800x600 resolution, and it will return the scaled coordinate relative to the current resolution.
VGUI text elements support automatic localization for the preferred user language. Lets assume a text label should show "Hello world!" then you could set this text directly with SetText( "Hello World."). But if the user would choose a different language than English this label would still show the English text. Therefore you should always use localization tokens to tell VGUI to translate the token into user language, in this example SetText( "#MyMod_HelloWorld"). Tokens are strings starting with the pound sign '#' as control character to tell VGUI that this is not plain text.
VGUI keeps a global translation table to map tokens to plain text representation. These translation tables are loaded from resource files, were each file has an extra copy for every supported language (e.g. \resource\hl2_english.txt, \resource\hl2_german.txt). A new token definition for your game would look like this:
In mymod_english.txt:
	"MyMod_HelloWorld"			"Hello world."
In mymod_german.txt:
	"MyMod_HelloWorld"			"Hallo Welt."
	"[english]MyMod_HelloWorld"		"Hello world."
If your game folder is named "mymod" the Source engine will automatically load the correct translation file (/resource/gamedir_language.txt). You can load additional translation files using the ILocalize interface function AddFile(�).
You can use the ILocalize interface also to manually translate a token into current user language, e.g. vgui::localize()->Find("#MyMod_HelloWorld"). This function returns the translation as a 16-bit wide char string (Unicode).
VGUI uses Unicode for all text representation to support languages that use more then the 255 ASCII characters like Chinese or Russian. Language resource files are encoded as Unicode. To convert strings between ANSI ASCII and Unicode during runtime you can used the ILocalize interface functions ConvertANSIToUnicode(�) and ConvertUnicodeToANSI(�). Also a very useful function is ConstructString(�) which is basically like sprintf(�) for Unicode strings.
This example focuses on Adding a New Element to the already existing HUD. It doesn't go into sending messages from the server to the client that the HUD hooks into (See Valve SDK Documentation (http://www.valve-erc.com/srcsdk/Code/hud_elements.html)). It assumes a basic understanding of C++ syntax and using Classes, and that you know how to compile the SDK and run it, but that's about it.
This particular method was done using a blank Single Player MOD, I haven't tried the multiplayer part yet, so that may be slightly different (However this is a very simple client side only MOD so it will probably work fine).
The HUD is a VGUI 2 hierarchy. There is a main window/hud (accessed by g_pClientMode->GetViewport() ) which is basically the screen. This is the parent of other VGUI Panels, which make up the individual HUD components, I.E. Health count, Ammo count, etc. Each component derives from VGUI::Panel. Valve also made a CHudNumericDisplay class you can use to show simple components like the health and ammo (it derives from VGUI::Panel itself).
The only files you need to worry about for this are on the client side. All the HUD components are in Client->Source Files->HL2 DLL in VS2003 Solution explorer, or cl_dll\hl2_hud in the windows folder heirarchy. We will first make a new blank header file here called hud_monitor.h (Right Click on HL2_DLL folder in the Solution explorer and choose Add->New Item). I would recommend putting this in cl_dll\hl2_hud with the other hud files, but it can be anywhere.
In this we'll put:
  #include "hudelement.h"
  #include <vgui_controls/Panel.h>
  class CHudMonitor : public CHudElement, public vgui::Panel
  {

     DECLARE_CLASS_SIMPLE( CHudMonitor, vgui::Panel );

  public:
     CHudMonitor( const char *pElementName );

  protected:
     virtual void Paint();
     int m_nTextureID;

  };
The 2 includes allow us to derive from CHudElement and vgui::Panel, which are the standard base classes for a HUD Panel.
Our Class is called CHudMonitor; it's good to tie Class Names to the File name, because it just makes things easier :). It derives from CHudElement (an interface for adding this class to the hud), and the basic VGUI Panel class.
Inside our class we call a Macro, which basically tells the compiler to put a set of instructions in place of where the macro is, putting in the arguments we supply. This performs some housekeeping with HL2 classes declarations.
Under Public definitions we put the constructor. Under Protected we put the Paint(); function. This is itself an override of the Paint function in the base classes, but we need to do some stuff to show our texture here. We also put the variable m_nTextureID, which will act as an Index to our Texture.
Thats it for monitor.h.
Now we need the actual implementation of the classes, so create a file called hud_monitor.cpp' in the same folder. In it we'll start with this:
  #include "hud.h"
  #include "cbase.h"
  #include "hud_monitor.h"
  #include "iclientmode.h"
  #include "hud_macros.h"
  #include "vgui_controls/controls.h"
  #include "vgui/ISurface.h"

  #include "tier0/memdbgon.h"
hud.h is an generic include file handling some basic Hud commands. cbase.h is another generic file that includes other important header files. hud_monitor.h is the header we just created with the definition. iclientmode.h defines the vgui namespace and some the GetViewport() function. hud_macros.h is not used in this tutorial, but contains the macro definitions like HOOK_HUD_MESSAGE that allow you to connect to server->client msgs, so it's useful. controls.h contains lots of vgui namespace definitions for controls for forms. ISurface.h contains some nice VGUI drawing commands.
memdbgon.h appears to allow memory debugging; I'm not sure about that but it looks important :).
now add this below:
  CHudMonitor::CHudMonitor( const char *pElementName ) : CHudElement( pElementName ), BaseClass( NULL, "HudMonitor" )
    {
       vgui::Panel *pParent = g_pClientMode->GetViewport();
       SetParent( pParent );

         //AW Create Texture for Looking around
          m_nTextureID = vgui::surface()->CreateNewTextureID();
          vgui::surface()->DrawSetTextureFile( m_nTextureID, "debug/debugcamerarendertarget" , true, true);

          SetHiddenBits( HIDEHUD_PLAYERDEAD | HIDEHUD_NEEDSUIT );
    };

    DECLARE_HUDELEMENT( CHudMonitor );
This defines the CHudMonitor Constructor Function. Those of you who know a bit more about Classes in C++ will see it also automatically calls function CHudElement and the Base Class's constructors. These are necessary so keep them in, but note the second parameter for the Base Class call, here it is "HudMonitor". This is the name by which the code will find more information in the hudlayout.res file, which is mentioned after this coding section.
In this constructor function we first get the main viewport using g_pClientMode->GetViewport(), which is a VGUI Panel, and set it as our parent. The SetParent function comes from the Panel Base Class we derived from. We then get a new Texture ID (An index to a place to put our texture), and then set the texture file we will want to draw later (It doesn't draw itself). I'm not 100% sure what the 2 true commands refer to but It looks like a good idea to leave them as true if you use this function. The texture file I'm using for this is the debug texture for cameras, but you can use any texture you want to show.
SetHiddenBits is another command from a VGUI Panel, and says under what circumstances we don't want to show the Panel. You can use:
HIDEHUD_WEAPONSELECTION		// Hide ammo count & weapon selection
HIDEHUD_FLASHLIGHT
HIDEHUD_ALL
HIDEHUD_HEALTH			// Hide health & armor / suit battery
HIDEHUD_PLAYERDEAD		// Hide when local player's dead
HIDEHUD_NEEDSUIT		// Hide when the local player doesn't have the HEV suit
HIDEHUD_MISCSTATUS		// Hide miscellaneous status elements (trains, pickup history, death notices, etc)
HIDEHUD_CHAT			// Hide all communication elements (saytext, voice icon, etc)
HIDEHUD_CROSSHAIR		// Hide crosshairs
HIDEHUD_VEHICLE_CROSSHAIR	// Hide vehicle crosshair
HIDEHUD_INVEHICLE
Rather annoyingly, if you dont put anything, or just HIDEHUD_PLAYERDEAD, it will show on the main screen if you have a cool Map Background, so HIDEHUD_NEEDSUIT is a good 1 (Plus you need the suit to see the rest anyway by default).
And finally:
void CHudMonitor::Paint()
  {

     vgui::surface()->DrawSetTexture( m_nTextureID );
     vgui::surface()->DrawTexturedRect( 0, 0, this->GetWide(), this->GetTall()  );
  }
vgui::Surface() gets us a pointer to a Class we can use to draw stuff with. DrawSetTexture sets the texture (from a textureID) it will use to draw with, and DrawTextureRect draws a rectangle with this texture (duh). The arguments for this are:
position of top left corner across relative to top left of the panel position of top left corner down relative to top left of the panel rectangle width rectangle height this->GetWide() and GetTall() just gets the current width and height of this panel. Now compile the code and try running it (you'll need to use Impulse 101 in the console to give yourself the suit and stuff) :).
This code will draw us a panel, but it will be right in the top left corner and very small :). To change this Valve have a file called hudlayout.res in the scripts/ folder. This contains the basic parameters of the Hud Layout.
Open it up and at the top and after
  "Resource/HudLayout.res"
  {
add this:
  HudMonitor
  {
     "fieldName" "HudMonitor"
     "xpos" "0"
     "ypos" "0"
     "wide" "266"
     "tall" "200"
     "visible" "1"
     "enabled" "1"
  }
HudMonitor is the name we put in the base constructor call above. If you change this, change the Baseclass(NULL,"HudMonitor") call aswll. For fieldname, just keep it the same as the main name. xpos sets the X position of the top left corner; ypos sets the Y position of the top left corner; wide sets how wide the panel is; tall sets how tall it is; visible sets its default state to visible enabled... makes it enabled by default. These are standard and loaded into existing variables in code. If you don't put them in, default values will be used.
IMPORTANT POINT: These values refer to a screen resolution of 640x480. VGUI will automatically scale these values to match other resolutions, so remember that when thinking up values. putting a r in the xpos field will justify it to the right of the screen, but it still refers to the top LEFT point of the panel, so "r0" will put your panel off the right of the screen.
hudlayout.res includes none standard field definitions. To use these put
CPanelAnimationVarAliasType( type, variable_name, "name_in_file", "default_value", "special" );
Special is an optional field, you can use "proportional_float" to make this variable value proportional to screen scaling from 640x480 resolution.
Another thing I want to discuss while working on this project is how to personalize your menu screen, titles etc. You can even customize the look and feel of the whole game menu. This gives a personal touch to the mod in my humble opinion. For this you need to modify GameInfo.txt and some other precompiled script files in the script directory.
For editing your screen menu, the screen where you can find Create Server, Find Server and other stuff, you would have to edit GameMenu.res which you can find in <your steam directory>\steamapps\sourcemods\<your mod>\resource directory. Through this file it is also possible to start a game with a certain map. Normally console commands won't work in a .res fils, but if you prefix the command with "engine" it is possible to run console commands in a .res file. This way you can modify a label to run a map e.g.
Code:
"GameMenu"
{
   "1"
   {
      "label" "Betreed de VU"
      "command" "engine map s353_new"
   }
   "2"
   {
      "label" "Afsluiten"
      "command" "Quit"
   }

}
This example has two menu items. Item one starts a map called s353_new and item two quits/exits the game.
This concludes my chapters for modding Half-Life 2 Death Match.
I'd like this opportunity to thank Anton Eliëns, Winoe Bhikharie, Kin Hung Cheng, Steve Stomp, Niels Rietkerk, Mikhail Zouskov and of course the community @ the Verve Collective and HL2World.com. This wasn't possible without you guys.
[]