[]
![]()
![]()
![]()
![]()
There are many different programs to create models and objects. Commonly used packages are 3D Studio Max, Maya and XSI. During this project I chose for Milkshape. It is a simple to use 3D modeling program (http://www.milkshape3d.com). At the start of this project I started with Maya, but because of the high learning curve, complexity and the possibilities to ex- and import .SMD files in Milkshape I switched over to Milkshape. In the following section I will discuss the options that Milkshape offers to create a model.

Figure 2.1, Milkshape's main screen
Compared to other 3D packages Milkshape comes with very simple functions. Other packages have a lot more capabilities, but nonetheless the techniques are actually the same. I won't cover all that is known in modeling for Milkshape, but enough to create a simple model.
The Milkshape UI consists of a maximum of 4 different views, which are all changeable in a front, back, left, right, top, bottom and 3D perspective view. The UI consist of four tabs (see figure 2.2):
- Model
Here you can find all the basic functions to create models and joints - Groups
Here you can divide the model in different sections/parts - Materials
Here you can assign materials to an object. - Joints
Here you can assign vertices to the joints

Figure 2.2, the menu structure
Besides the basic geons, it is also possible to create vertices with the vertex tool. To create polygons, select the face tool and link up the vertices in a counter clockwise direction, while selecting them in clockwise order would mean the face would be pointing backwards. You can also select and manipulate your object. With the select tool you can select in four different ways. It can select vertices, faces, groups and joints. I found it very handy to disable the ignore backfaces option. As the name states, backfaces aren't ignored anymore. If this option is enabled you can't select all faces or vertices. Manipulation is done with the move, rotate, scale and rotate tools. For modeling it can be useful to load in image planes. These are backgrounds which can be used to create a model. In order to create a good model a frontview and a one sideview are needed. Place the front image plane in the frontview, and side image plane in the sideview. Make sure it is placed in the appropriate sideview (left or right). Only one view is needed, because the other side can be mirrored. To load a background, right-click in a viewpoint and select "choose background image", and then open the file.
In the groups tab the model can be divided in different parts. This can be very useful for assigning textures. Dividing is done by selecting the faces or vertices, then pressing regroup and (optionally) renaming them. The last two tabs are for assigning textures and vertices to the joints. I will discuss texturing in the next section.
The joints are made with the joint tool (in the Model tab). Select the joint tool and start clicking in the appropriate positions. Note that joints created after the first one are children of the first one. So manipulating the parent will have effect on the children. Milkshape comes with a standard Valve skeleton, which can be imported to your model. (see Figure 2.3) Make sure that when you move the skeleton, you have selected the parent. Otherwise it will change form. This also counts for resizing it. So start from the parent down to the children.
Assigning vertices to skeleton:
- Select the Vertex Tool and select the wanted vertices.
- In the Joints tab, click on the assign button. With Selassign the choosen vertices can be viewed.
- (Optionally) Just with renaming the group the joints can also be renamed.
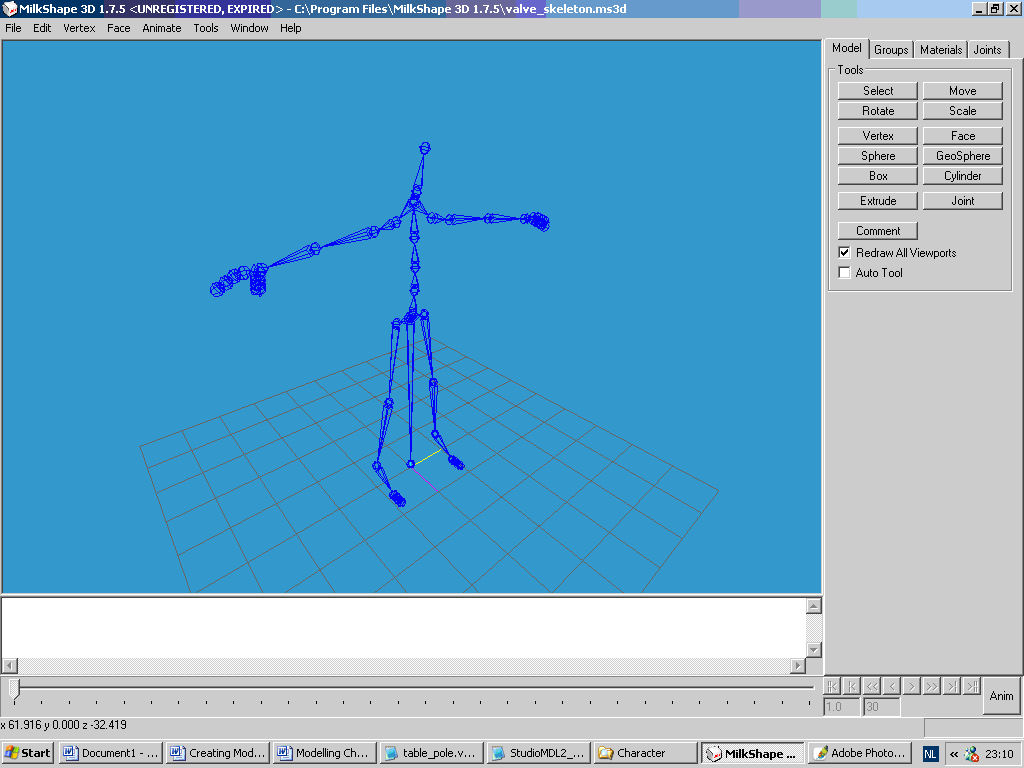
Figure 2.3, Valve skeleton
The Milkshape package comes with texturing tools, but these aren't very useful. I made use of a program called Ultimate Unwrap 3D. (http://www.unwrap3d.com/downloads.aspx) To texture a object you first need to create a UV map. Here is a step-by-step explanation to create a UV map:
- Load in your object in Ultimate Unwrap 3D
- Right-click on materials and click on add
- Choose for diffuse map and map type checker
- (Optionally) choose two colors
- Click on the created material. This will let the checkers pattern appear in the screen
- Go to Edit and Unhide all, this will unhide all the faces
- Right click on one of the items in the group section and click select
- Right click on the created material and click assign. This will assign the current material to the selected group.
- Go to 2D tools and click on UV mapping. Now a subsection will appear where you can choose five different UV mapping techniques.
- Planar
- Box
- Face
- Cylindrical
- Spherical
- When maps for every group are created, you have to scale them so that they will fit to the grid.
- Go to File and select export. Here you can export the UV map to a .BMP file.
Tutorials for this program can be found at this website http://www.unwrap3d.com/tutorials.aspx.
The .BMP file has to be converted to a .TGA file, because the Half Life engine uses these .TGA file for creating materials. In Milkshape the texture can be assigned to a group in the following way:
- Click on the Groups tab and select to which group you want to assign the texture
- Click on the Materials tab and create a new material
- In the material section (where you can see a sphere) click on <none>
- Select the created UV map for the group. This will project the texture to the group
- If the UV map isn't aligned the right way, click on Window and select Texture Coordinator Editor. With this editor you can move the vertices, so the UV map will be aligned the right way.
Editing the UV map was the hardest part for me. My experience with graphical applications like Photoshop isn't that great. I found some tutorials which explained some techniques for creating realistic textures. (http://www.photoshoptutorial.net). But the most important thing I learned was that I need more practice to create good and realistic textures.
To edit the UV map use a graphical application, like Photoshop or Deep Paint. I chose for Photoshop. Start by loading in the UV map. The first thing to do is divide the different parts into different layer. That way you will have a good overview. The next step is to select a group by using the polygon selection tool. After that, you fill the selection with a color. When finished you can start creating realistic effects, like airbrushing and put layers over layers. But as I said, due to lack of experience I can't go into detail.
To export the created objects to .SMD two options were studied, one by using Milkshape and one by using Maya. Milkshape is the simplest one. The only thing to do is:
- Load the object
- Go to file and select Export
- Select Half Life's SMD
- The output will be created in your save path.
Note: Only the reference .SMD and the animation .SMD file will be created. It is also possible to create a .QC file, but this tool does not create a valid .QC file.
If you want to export with Maya you have to add some scripts to Maya. You can either write it yourself of download it from the following website, http://mitglied.lycos.de/prallvamp/. It can be used for Maya 4.0 up to 7.0. Installation:
- Extract all files from the zip to C:\Documents and Settings\<username>\my documents\maya\*.* This will overwrite your existing maya prefs and scripts folder. Now restart Maya and new ex- and import options will be available in File. It will now be possible to work with SMD and Hammer files in Maya.
To export a model there has to be a object on the grid. Creating a basic textured object in Maya:
- Click on the Polygon Tool in the shelf and select a sphere.
If you want to create a reference and physics .SMD file, duplicate the object. - To texture the object, open the Hypershade editor. Select a PhongE shader node and place it in the workspace.
- Connect a file node to the PhongE shader (drag-and-drop onto the PhongE shader node)
- Select the file node and go to the Attribute Editor
- In the <image name> field select your texture.
- Drop the PhongE shader node onto the sphere.
Note: only the reference .SMD has to be textured.
Now the object can be exported. Go to File and click on the Export SMD option box. Figure 2.4 shows the option box. It has the following tabs: Export, Path Settings, QC settings, Animations and Help.

Figure 2.4, SMD exporter for Maya
Export
In this tab a selection can be made between which .SMD has to be exported. Notice that the created object(s) will have to be placed in a layer: the reference and physics layer. This must be created in Maya. Objects that are not in the layers will not be exported. Besides this, other options like creating a .QC file, compiling a .MDL file or creating a preview in .JPG format can be enabled.
Path Settings
Here you can choose where the .SMD and .QC have to be stored.
QC Settings
In the QC settings, variables can be added and edited, like mass, scale and staticprop. There is even space to add extra text.
Animations
Animations can be chosen and edited here. A name can be given and start- and endframe chosen. The text output while be generated in the .QC file.
If you have problems with ex- or importing, you may find some handy information on this forum. http://www.chatbear.com/board.plm?a=viewthread&t=204,1117578174,7260&id=860084&b=4990&v=flatold.
[]