[]
![]()
![]()
![]()
![]()
In this section the files will be discussed which the Half Life engine needs to compile characters and objects for use in Half-Life 2. In Figure 1.0 you can see an overview of the extensions. On the left are the model files and on the right are the texture files.
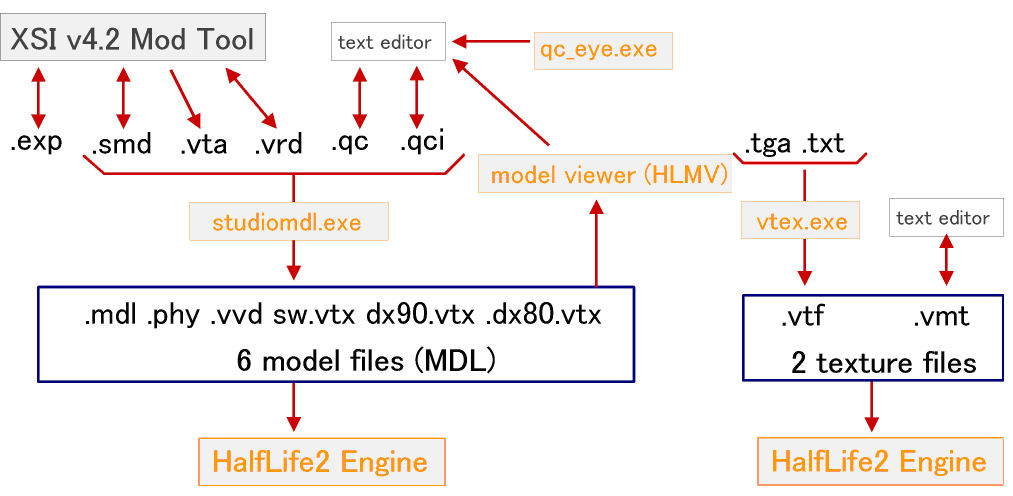
Figure 1.0, Modeling and Texturing files
.SMD files are the file by which the .MDL files are created. There are different ways to generate a .SMD file. During this project two of those were studied, by using Mikshape and by using Maya (very broad). .SMD files come in three different ways:
- Reference .SMD
- Physics .SMD
- Animation .SMD
A reference SMD file is a complete snapshot of the model, including its geometry, skeletal structuce, texture and the links between its mesh vertices and skeleton. These reference SMD files don't need any animation data. They produce a static image of the complete model. Viewed in a text editor a long list of 3D coordinates will show up.
The physics .SMD is the volume that the physics engine uses to calculate collisions, and any links between its verticies and the skeleton, in other words for touch. The animation .SMD contains only animation data and information for StudioMdl to be sure that the animation data matches the skeleton of the reference model. A .SMD file always needs a animation, even if the model is static. During this project there were made animations, but only static models will be implemented in the VU Game.
QC file stands for Quake Command file. It can be seen as a kind of table of contents for model projects, containing a list of all the assets which will be included in a finished model. Things like animations, submodels, textures and weight can be found in it. The primary function is to tell StudioMdl.exe where to find textures and SMD files. Furthermore, the .QC file is the place where game engine data is specified. The file has the extension .qc and can be edited in a text editing program. Figure 1.1 gives an example.
cd "."
scale 7.0
staticprop
texturegroup skinfamilies
{
{ "nskingr" }
{ "nskinorg" }
{ "nskinred" }
{ "nskinwh" }
}
collisionmodel "ninja_site.smd"
{
concave
}Figure 1.1, QC file
Some basic commands:
- cdmaterials <materialpath>
It tells the engine where to look for the models materials, only put the name of the directory - scale <scale>
This defines the size of your model. You can use any number you want, the number 1 represents the actual size. - model <SubModelName> "<smdfile>"
Defines what model to use as a sub object and gives it a name. - sequence <AnimName> "<smdfile>" fps <fps>
Here you define the models animations. You always need a animation. If there is no animation, fill in 1 as in only one frame. - Mass
This lets you set the objects mass in kilograms- concave
Tells studiomdl to assume the collision is concave (i.e. a set of convex chunks). Basically studiomdl assumes the model is a single convex. - concave
Materials for Half Life use two files as there source, .TGA and .TXT files. A TGA file stands for Targa file. It can be created with a lot of applications, like Photoshop, Painter, Deep paint and JASC paint Shop.
A .VMT file is created out of the .TGA and .TXT file. It defines the lighting model, the base texture, and any other channel, such as proxy shaders. It can viewed as the material output, but not what is seen in the engine. The output is called a .VTF file. Figure 1.2 shows an example of a .VMT.
"VertexLitGeneric"
{
"Figure 1.2, a VMT file
In baseTexture the base texture is defined. This a very simple .VMT file. The Valve Developer community provides a much detailed example http://developer.valvesoftware.com/wiki/Materials_for_models.
The .TGA file is converted to a .VTF with an application called Vtex. I used a tool found on the internet to generate this file, it is called VTFTool (http://www.wunderboy.org/sourceapps.php/).
Creating a .VTF file:
- Create a .TGA format file, with dimensions equal to powers of two.
- Save it in: C:\Program Files\Valve\Steam\SteamApps\<accountname>\sourcesdk_content\<gametype>\materialsrc\
- Place the VTFTool.exe the following folder: C:\Program Files\Valve\Steam\SteamApps\<accountname>\sourcesdk\bin\
- Choose the type of conversion you want to perform (VTF to TGA or TGA to VTF).
- The compiled material will be placed in C:\Program Files\Valve\Steam\SteamApps\<accountname>\<modname>\<gametype>\mater-ials.
Note: the program comes with a lot of options; one of them is "use config.TXT". This is the only one I used and I did not get any errors, but the developer mentions that the program is not error proof.

Figure1.3, VTFTool
The package of Half Life 2 comes with a command line program that creates the Half Life model files. It's called StudioMdl.exe. It uses the .qc file to find the relevant .SMD and texture files. The resulting product is a Half Life model file, .MDL, which contains all the necessary data (such as geometry, animations, etc). Besides creating the .MDL, it also provides feedback on the amount of memory used for compiling the model. This can be useful in debugging and optimizing the model.
For the creation of the models during this project, we made use of a GUI that generated the .MDL file. It is called GUI StudioMDL 2.0, and can be found on the following website: www.wunderboy.org. Before compiling the .MDL you first have to set up the necessary paths so that the studiomdl.exe and the GameConfig.txt can be found. This text file is used to select for which game or mod you are creating the models. A step-by-step installation and compiling procedure:
- Place the StudioMDL 2.0 GUI in the following folder: C:\Program Files\Valve\Steam\SteamApps\<accountname>\sourcesdk\bin\. In this folder you can find the command line program studiomdl.exe.
- Start GUI StudioMDL 2.0 and set path for studiomdl.exe (see previous step).
- Set path for GameConfig.txt. This can be found in: C:\Program Files\Valve\Steam\SteamApps\[accountname]\sourcesdk\bin\GameConfig.txt
- Select target mod or GameInfo path. (for example Half Life 2: Deathmatch)
- Load the .qc file and click on the compile button.
- If everything went ok the .MDL file can be found in your models folder (C:\Programs Files\Valve\Steam\SteamApps\<username>\<modname>\<gametype>\models\).
Note: Besides the .MDL file the other 5 modeling files are also created.
The resulting .MDL file can be viewed with Half Life Model Viewer (HLMV). If your textures won't show up, you will see pink/black checkers. This means that HLMV couldn't find the textures. For this problem there are two possibilities.
- The MDL's texture path is incorrect. This can be solved by using Source MDL Texture Info (http://www.wunderboy.org/sourceapps.php#mdl.tex). With this program you can locate your MDL's texture path. The easiest way is to make a shortcut on your desktop and drag you're the .MDL file over the icon.
- HLMV could find the .VMT file, but the .VTF texture path in the .VMT file is incorrect. This often happens when you have moved the .VMT/.VTF location. Open your .VMT file in a text editor and check
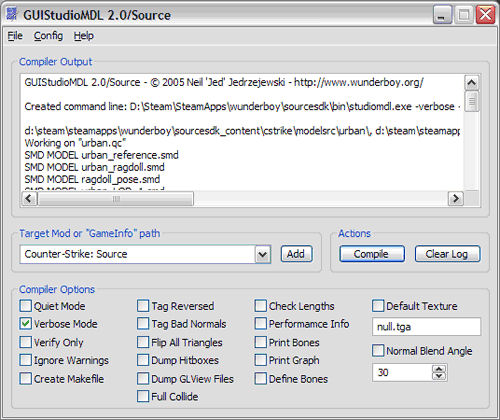
Figure 1.4, GUI StudioMDL 2.0
[]