[]
![]()
![]()
![]()
![]()
Hammer is the editor included with Half-Life 2 that can be used to create your own maps. This document describes how Hammer can be used to make maps for the multiplayer game Half-Life 2: Deathmatch (HL2 DM).
Make sure to have run "Half-Life 2: Deatmatch" once. You can find it in the "Games" list.
From the "Games" menu choose the option "Source SDK". A new Source SDK menu should appear.
Now choose "Half-Life 2: Deathmatch" as your current game from the pulldown menu at the bottom of the menu. To launch Hammer, choose the option "Hammer editor" from the Source SDK menu under "applications".

To learn the basics of the Hammer editor, we will make a simple HL2 DM level. Each HL2 DM level must consist of a sealed off room with at least one player entity. This section is partially based on (Valve Developer Community, 2005 (3)).
To start, choose the option "New" [Ctrl+N] from the "File" menu.

You will now see four panes: a camera view and three 2D views.

The camera view gives a preview of how the map will look like when compiled and run in HL2 DM. The other 3 panes give you information about your map from the respective 2D viewing points: top (x/y), front(y/z) and side (x/z). The actual editing is done in these 2D view panes.
The process of creating a brush always follows the same four basic steps:
- Select the Block Tool.
- In the New Objects dialog, select Primitives in the Categories box. In the Objects selection box you will have multiple options. Select any one of these objects:
- Block
- Wedge
- Cylinder
- Spike
- Arch
- Sphere
- Torus
- Drag a box in a 2D view, making sure it is the correct size and in the correct position in each of the views.
- Press ENTER to create the solid.
To create the room, you first need to create a block shaped brush. To do this select the "Block Creation Tool" (fifth icon on the left) [Shift+B]. On the right of the screen, make sure the following options are selected:
Categories: Primitives
Objects: block
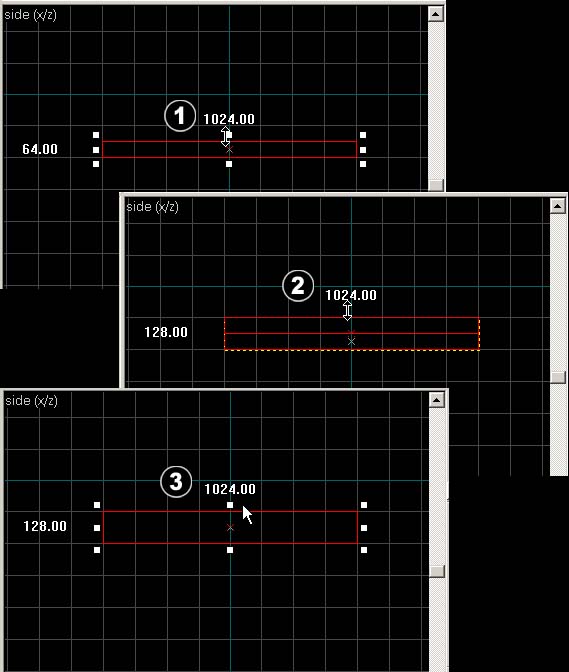
In the Top 2D View (the upper-right window pane), click and drag to create a box, as shown in the image below to set the shape of the brush.

Right-mouse click in the center of the brush to get the Create Object menu, then left-click the menu to create the brush.

In the camera view you can see what you made: a block brush with a texture. Use the W,A,S and D keys to move around in the camera view pane; use the arrows to rotate your viewpoint in the camera view.
To be sure you actually can see the textures, click on the "View" menu and choose "3D Textured Polygons" once.
The selection tool is used to select different objects in the map, as well as move and resize them. To use it, click the "Selection Tool" (first icon on the left) [Shift+S].
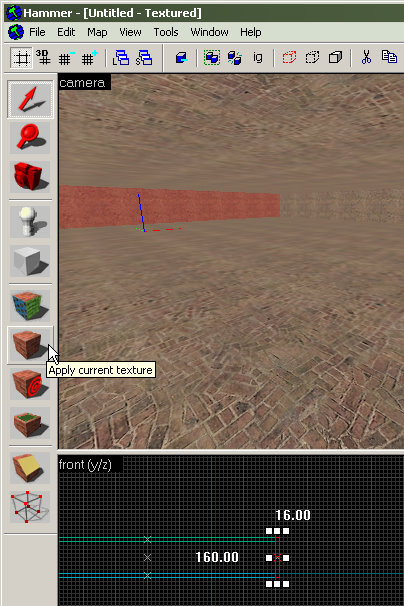
To increase the height of the brush we have made, click and drag the square edge handle in the Side 2D View (the lower-right window pane). The cursor should change to the move handle cursor when you have the correct handle. Drag the height so that it is 128, as shown in this image. If you make a mistake, simply grab the handle and try again.
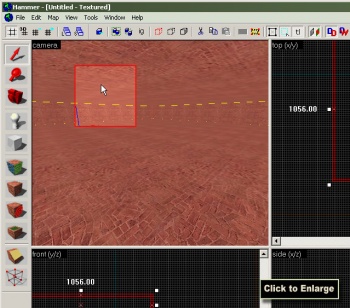
Next we will create a Camera, which will help us navigate in the 3D View to see what we have created. Select the Camera Tool (third icon on the left) [Shift+C].
To create the Camera, click and drag to create the Camera in the Top 2D View, as shown in this image.

You can use the Magnify Tool to change the zoom level in the 2D viewports. First select the Magnify Tool (second icon on the left) [Shift+G]. Now left-click in a 2D viewport to increase the magnification, and right-click to zoom back out.
When you're done with the Magnify Tool, switch back to the Selection Tool.
Alternatively, the wheel on the mouse can be used to change the zoom level in all of the viewports.
First, make sure the brush is still selected. Now select Make Hollow from the Tools Menu.We can use this to make a hollow room out of the single solid brush we've made. If the Make Hollow command is greyed-out, it means you accidentally de-selected the brush. Click on the brush in the 3D View to select it again.
The Hollow dialog appears.
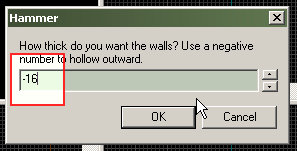
Change the value in the box from the default of "32" to "-16", which will create 16-unit thick walls for our room. Click OK when you are done.
Pick the Selection Tool again. Left-click the hollow room, so that it turns red, like in the image here. You've selected the room.
Select Ungroup from the Tools Menu [Ctrl+U]. This separates the pieces of the hollowed room into separate brush objects that can be individually selected and manipulated.
Click the Browse button in the Texture Bar on the right side of the Hammer window. This will open the Texture Browser. The Texture Browser lets you view and select textures to apply to objects in your map.

Pick 128x128 from the Size drop-down list at the bottom-left of the Texture Browser window, if it's not already selected. This will reduce the size of the texture samples, so we can see more at once. Double-click a wall texture, for instance brick/brickwall017b. This will select the texture for use, and close the Texture Browser.
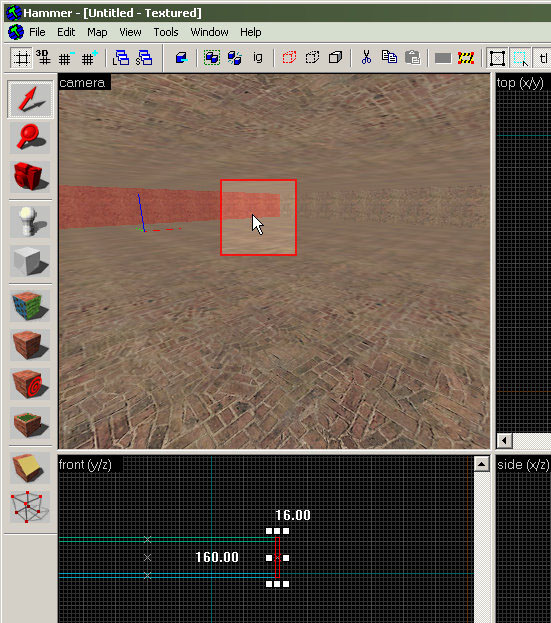
In the 3D View, left-click one of the walls of the hollow room. This will select it, turning it red like in this image.
Click the Apply Current Texture icon from the panel on the left side of the Hammer window. Clicking this button applies the texture we picked in the Texture Browser to the current selection.
Move the camera so that it faces the other walls that haven't been textured yet. Select each of the walls with the Selection Tool, and use the Apply Current Texture icon to assign the wall texture, just like the other wall.
It is possible to use your own textures in Hammer. To do this you need to create a so-called material. Materials are what the Source engine uses to define which textures (in .VTF file format) and shaders (functions which define how materials are rendered to the screen) are used on surfaces (models, world surfaces, sprites, etc). To learn how to create materials, see Appendix B.
(From (Valve Developer Community, 2005 (2))
Entities give life to your level. They are the monsters, doors, switches and lights that turn your static architecture into an interactive environment. Careful use of entities is critical to creating an interesting, unique and fun level for others to play.
Unlike solids, entities are not created within Hammer. Most users will simply choose from a pre-existing set of entities provided. Once you have selected the appropriate entity, Hammer gives you control over its placement and other properties.
There are two types of entities: point-based and brush-based.
Point-based entities exist only at a certain exact point. Examples include lights, monsters, and player start points. (Monsters do have an area, but it is defined by the game code and is not modifiable from within the map.) Some point type entities are just that: points. For example, the env_beam entity, which controls beam effects, uses two info_target entities as targets and the beam of light runs between these two points.
Brush-based entities are entities that depend on either a brush for their physical presence (like platforms, trains, and other moving entities) or an "area" (like triggers, which require an activation field).
We will place a info_player_deatmatch entity in the level, which is a point-based entity.
First pick the Entity Tool from the icon bar on the left side of the Hammer window.

Next, we need to pick which entity to insert. The Object Toolbar by default in the lower right corner of the Hammer window has a list of possible entities. Pick the info_player_deathmatch entity from the drop-down list, as shown in this image.

Now we need to place the entity in the map. In the 3D View, click the floor of the room, like in the image here. The info_player_deathmatch entity will be placed at the spot you click. Players that join the map will spawn at the location of the info_player_deathmatch entity.

You are now done building a basic room. In the next section, compiling will be explained.
Compiling is necessary to create a map that can be executed in HL2:DM. Before you can compile a map, you need to save it [Ctrl+S]. After saving, press F9 to bring up the "Run Map" menu.
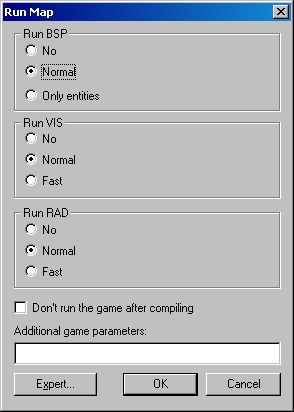
It consists of three parts:
Run BSP (vbsp) - This tool creates the BSP (Binary Space Partition) file that will be your map.
Run VIS (vvis) - This tool sets the portals on your map. It determines what must be rendered in a certain area, allowing the game to ignore parts of the map, speeding up rendering.
Run RAD (vrad) - This tool calculates the lighting of a map. If Vrad is not used, the level will be lit in fullbright mode.
The bare minimum for compiling is "Run BSP" in normal mode. Using vvis and vrad can help you in creating respectively more efficiently running and better lit maps.
Beside the compile options, you can choose to immediately have HL2 DM run after compiling. Only do this if you are certain your map contains no compile errors. It is a good idea to initially check the option "Don't run the game after compiling". If you succesfully compiled your map, you can directly run your map from the "Run Map" menu by selecting "No" for "Run BSP", "Run VIS" and "Run RAD" and unchecking the "Don't run the game after compiling" option. You can only have one instance of HL2 DM running at the same time. If you already have HL2 DM running, type the following into the HL2 DM console to load your map: "map mapname" where mapname is replaced by the name of your map (without any file extensions).
In the "additional game parameters" field you can put options you want to be active when running HL2 DM. Each option has the format "-parameter", where parameter is replaced by an actual parameter. Recommended parameters for running HL2 DM: "-dev -console -sw" (respectively: give developement information, run console, run game windowed).
If you click the "Expert..." button, you switch from the current compiling menu to a more advanced compiling menu, which gives you more possibilities to compile your map. In this document the basic compiling menu will be used.
If you are ready to compile your map and/or run your map in HL2 DM, click on the "OK" button; otherwise click on the "Cancel" button to go back to the main editing screen of Hammer.
There are two reasons for making your maps as efficient as possible. Firstly, it will saves on compiling time. Secondly, it will save on rendering time.
Therefore, it is better to immediately start to build your maps efficiently, because optimizing it later on will always be harder and result in more work. In other words, start optimizing immediately!
In next sections you can find some general optimizing strategies by (Zombie, 2005) in summarized form.
- Do not enclose your entire level in one box (with skybox texture). This will generate extra leafs, lightmaps, clipping hulls, faces, et cetera to be drawn.
- Fix leaks. Leaks are holes in your map. Since the compilers will try to find out what the inside is of your level (so they do not have to create the outside) they will not be able to do that if the inside of your level is in contact with the outside.
- Don't make world-brushes overlap. Vvis doesn't like it, and it may create extra faces. It will also make your map less orderly.
- Don't overdo dynamic lights. They are quite hard to render. Also, if you are using point_spotlights, check the "no dynamic light"-flag, to see a big increase in performance.
- Make brushes standard sizes. Not only will it be easier for you to use them, but its also easier to find and prevent (small) leaks.
Standard sizes are 8, 16, 32, 64, 128, 256, 512, 1024 units.
Using standard sizes will also enable you to stay on the grid and use textures without the need to shrink or stretch them to awkward values. This is not a hard rule, but it will make your life so much easier. To help doing this, I suggest you use a big grid (16 units) and only decrease its size when your making detail brushes. Also, do not forget to keep your brushes on the grid, not doing so will result in a less orderly, bigger map. - Don't use carve for any non-square brushes. If you do, tidy it up after. If a wall consisting of dozens of brushes due to carving of a cylinder in it will not slow down you map, I do not know what will. The keypoints here are to:
- minimize brushes and faces as much as possible
- make sure all points are on the grid and preferably as straight as possible so they are easier to handle, and less prone to make errors.
- Don't overdo water. On multiplayer maps water usually is a no go, because it means a lot of lag.
- Map wisely. If the entire map can be seen from one point, there is not a lot of optimization you can do. Try to avoid large, open area's since you can't optimize them. Instead, try to block the player's view (that of vvis to be exact) with buildings or walls to make sure you can actually hide parts where the player is not looking.
This magical texture makes all faces which it is put on dissappear completely. You apply it as any other texture. You can find it searching for "nodraw" in the texture browser. When you use it on a face, the engine doesn't have to draw that face at all, meaning less load and faster maps. The effect for one face is minimal, but using it massively is a different matter. So when do you use it? As much as possible! Any face the player will never see, should get this nodraw texture. Think about things like the rear of walls the player never gets to see, or the roof of buildings, walls that are covered by entities (e.g. func_details, see next section). You can also use brushes with "nodraw" on all sides of a brush to close holes created by displacements. Only one exception: "nodraw" doesn't need to be applied to faces on the outside of the level, or ones that are already covered entirely by other world-brushes or func_details, since those faces are automatically removed by Vbsp.
You may prefer to build your entire level with "nodraw"-textures and only texture the faces you can actually see, to make sure the engine doesn't render more faces than it has to.
The func_detail is a strange entity, because it isn't one. The func_detail is only used to give vvis an easier job figuring out your level. How does it work? Well, as soon as you tie a brush (or a bunch of them) to a func_detail, these brushes become entities. Entities cant seal leaks, but they are also ignored by vvis. This can save hours of compiling, simply because vvis doesn't have to calculate what you can and cannot see when you are looking through these brushes. Another great thing about this method is, that you can predict way more accurate how your level will be divided into leafs, so its easier to manipulate them. Func_details act like world-brushes for the rest of their lives, so they cast shadows, are solid but they wont cut up geometry like world-brushes (they do seem to do it occasionally btw, I can't really predict when). They won't block visibility (the engine will render everything behind them), but that's the only, and most negative point about these entities. So don't make walls func_detail if they can block visibility to big/complicated rooms.
So what do you tie to func_details? Again, as much as possible. Good candidates are brushes that never have to block visibility, like pillars, stairs, fences or roofs of houses that jut out, complicated brushes like brushbased machines, anything that's round, or plain walls you don't want to cut up leafs, like the walls above doors, below and above windows (exceptions are when func_areaportals are used). I am sure you can think of other uses for this great non-entity. Since func_details cannot seal leaks, do not use them on outside walls of your level, and because they are ignored by vvis, do not tie entire walls to func_details because vvis will think you can see everything behind it (and the game will try to render that too).
From (Valve Developer Community, 2005 (2))
| Tools | |
| Shift+S | Pointer Tool |
| Shift+G | Magnify Tool |
| Shift+C | Camera Tool |
| Shift+E | Entity Tool |
| Shift+B | Block Tool |
| Shift+A | Texture Application Tool |
| Shift+T | Apply Current Texture |
| Shift+D | Decal Tool |
| Shift+O | Overlay Tool |
| Shift+X | Clipping Tool |
| Shift+V | Vertex Edit Tool |
| File Operations | |
| Ctrl+N | Create a new file. |
| Ctrl+O | Open an existing file. |
| Ctrl+S | Save the current file. |
| Alt+B | Export again. |
| F9 | Run/Compile Map. |
| Ctrl+Shift+S | Open Sound Browser. |
| Undo/Redo | |
| Ctrl+Z | Undo. |
| Ctrl+Y | Redo. |
| Clipboard/Selection | |
| Ctrl+C | Copy objects to clipboard (also Ctrl+Insert). |
| Ctrl+V | Paste objects from clipboard (also Shift+Insert). |
| Ctrl+X | Cut objects to clipboard (also Shift+del). |
| Shift+Q or Esc | Clear current selections. |
| PgUp | Previous selection in "hit" list. |
| PgDn | Next selection in "hit" list . |
| Alt+Enter | Open up Object Properties for the currently selected objects. |
| Grid | |
| [ | Decrease the size of the grid. |
| ] | Increase the size of the grid. |
| Shift+R | Toggle grid on/off. |
| Shift+W | Toggle snap to grid. |
| P | Toggle 3D grid on and off (with mouse cursor in 3D view). |
| Grouping | |
| Ctrl+G | Group selected objects. |
| Ctrl+U | Ungroup selected groups. |
| Ctrl+R | Create prefab with selected objects. |
| Ctrl+T | Tie to entity. Creates an entity with selected objects, or adds objects to an existing entity if one is also selected. |
| Ctrl+W | Toggle Ignore Groups mode to bypass entity and group selection. |
| Ctrl+Shift+W | Move selected solid entities to world. |
| Carving/Hollowing | |
| Ctrl+Shift+C | Carve selected objects. |
| Ctrl+H | Hollow selected objects. |
| Viewports | |
| Ctrl+A | Auto-size 4 views to center. |
| Shift+Z | Maximize/restore current viewport. |
| Arrow keys | Nudge the current selection in the current 2D or 3D viewport. |
| Shift+Arrow keys | Clone the current selection and nudge it the current 2D or 3D viewport. |
| F6 | Cycles to the next active viewport. |
| Shift+F6 | Cycles to the previous active viewport. |
| 2D Views | |
| Ctrl+I | Flip selected objects vertically. |
| Ctrl+L | Flip selected objects horizontally. |
| Ctrl+B | Snap selected objects to grid (based on bounding box). |
| Ctrl+Shift+B | Snap selected objects to grid (individually). |
| Tab | Switch view types (top/side/front). |
| +/- | Zoom in/out (hold Ctrl to synchronize all 2D views). |
| Mouse Wheel | Zoom in/out (hold Ctrl to synchronize all 2D views). |
| 1 to 9 | Preset zoom levels. |
| Space | Hold space and left mouse button to drag view position. |
| Alt | Disable snap to grid while dragging with the mouse. |
| Ctrl+E | Center 2D Views on currently selected objects. |
| Space(Hold) | Use the Left Mouse Button to 'Drag' the 2D view around. |
| 3D View | |
| Space (holding) | Holding the left mouse button allows you to rotate your angle of view in any direction, while the viewing point remains stationary. Holding the right mouse button will allow you to move left, right, up, and down while keeping the viewing angle constant. |
| Space+Shift | The left mouse button acts the same as above. The right mouse button allows you to move forward and backward, as well as from side to side. |
| Mouse Wheel | Zoom in/out. |
| W | Move camera forward. |
| S | Move camera backward. |
| A | Move camera (strafe) left. |
| D | Move camera (strafe) right. |
| Z | Toggles 3D view "noclip" navigation mode. |
| P | Toggle 3D grid on and off (with mouse cursor in 3D view). |
| O | Display frames per second and yaw/pitch of camera (with mouse cursor in 3D view). |
| I | Display bounding boxes for all visible objects. |
| 1 | Decrease far clipping plane. |
| 2 | Increase far clipping plane. |
| Ctrl+Shift+E | Center 3D View on selection. |
| Selection Tool | |
| Ctrl | Hold Ctrl and click to select multiple objects. |
| Shift | Hold Shift when rotating to constrain rotation to 15 degrees; hold Shift when moving an object to create a copy (clone) of that object. |
| Left mouse | Click and drag left mouse button to select with a box; press Enter to select objects hitting the box, or press Shift+Enter to select objects only entirely within the box. |
| Esc | Cancel current selection |
| Camera Tool | |
| Shift or Alt | Hold Shift or Alt and click and drag left mouse button to create a new camera. |
| PgUp | Cycle to the previous camera position. |
| PgDn | Cycle to the next camera position. |
| Delete | Delete the current camera position. |
| Ctrl | Hold Ctrl and drag a camera or its point of interest to move both together. |
| Block Tool | |
| Left Mouse | Click and drag left mouse to draw a new brush shape. |
| Enter | Create object drawn with block/entity tool. |
| Esc | Delete object drawn with block/entity tool without creating it. |
| Alt+Shift+C | Insert original prefab. |
| Texture Application Tool | |
| Ctrl | Hold Ctrl and click to select multiple faces. |
| Shift | Hold Shift and click a face to select all faces on the brush. |
| Shift+Ctrl | Hold Shift and Ctrl, click a face to add all faces on the brush to the current selection. |
| Right-click | Apply the current material settings to the face that is clicked. |
| Alt+Right-click | Apply the current material settings to the face that is clicked, with wrapping. |
| Displacement Editing Tool, Select Mode | |
| Ctrl | Hold Ctrl and click to select multiple faces. |
| Shift | Hold Shift and click a face to select all faces on the brush. |
| Shift+Ctrl | Hold Shift and Ctrl, click a face to add all faces on the brush to the current selection. |
| Displacement Editing Tool, Paint Geometry Mode | |
| Ctrl | Hold Ctrl and click to select multiple faces. |
| Alt | Hold Alt and drag to alter the size of the spatial editing brush. |
| Shift | Hold Shift and drag a vertex to nudge the vertex along the editing axis. |
| Alt+Right-click | Click any brush or displacement face to make that face's normal the current painting axis. |
| Displacement Editing Tool, Paint Alpha mode | |
| Ctrl | Hold Ctrl and click to select multiple faces. |
| Shift+Ctrl | Hold Shift and Ctrl, click a face to add all faces on the brush to the current selection. |
| Overlay Tool | |
| Shift | Hold Shift and drag a overlay vertex to snap it to another vertex. |
| Ctrl | Hold Ctrl and click to select multiple overlays. |
| Clipper Tool | |
| Left mouse | Click and drag left mouse to create a new clip plane. |
| Shift | Hold Shift and drag with the left mouse button to create a new clip plane without performing the previous clip. |
| Enter | Perform clip |
| Ctrl | Hold Ctrl and drag with the left mouse button to move both handles of the clipping plane. |
| O | Toggle clip distance display on and off (with mouse cursor in 2D view). |
| Shift+X | Cycle through clip modes. |
| Vertex Edit Tool | |
| Ctrl+F | Split faces (vertex manipulation) must have two edges or vertices selected. |
| Alt+E | Open Vertex Scaling dialog. |
| Enter | Close Vertex Scaling dialog and perform scale. |
| Shift+V | Cycle vertex/edge display modes. |
| Miscellaneous | |
| Shift+L | Toggle Texture lock. |
| Ctrl+M | Open Transform dialog. |
| Alt+P | Open Check for Problems dialog. |
| Esc | Abort current tool/mouse operation (drag/drop) or clear current selection. |
| Ctrl+Shift+G | Go to Brush Number dialog. |
| Ctrl+Shift+F | Open Find Entities dialog. |
| Ctrl+Shift+R | Open Replace Entities dialog. |
- Take/create a picture with dimensions 128 x 128, 256 x 256 or 512 x 512.
- Save it as one of the following file types: bmp, dds, gif, jpg, png of tga.
- Download VTFEdit
- Install VTFEdit and start it. If you get an unhandled exception, install the .Net Framework v1.1 from Microsoft.
- Choose from the "File" menu for "Import" (Ctrl+I) and open the saved picture from step 1 and 2.
- You will now get an overview from the available options. You can experiment with it. Click "OK" to continue.
- The texture is now visible on the main screen of VTFEdit. On the left side you have 3 tabs with options. Again, you can experiment with it.
- To use the texture you have to save it. Choose "Save as" (Ctrl+A) from the "File" menu and save it under the desired name. You now have a Half-Life 2 texture with file type vtf.
- Copy the following text to a text file and change the path so that it points to your texture (no extension!):
"LightmappedGeneric" { " - Saves the text file as "NameOfTexture.txt" where NameOfTexture is replaced by the name of the vtf file.
- Copy both vtf file as vmt file to the following path to use it in HL2 Deathmatch:
[Drive letter]:\Program Files\Valve\Steam\SteamApps\[accountname]\half-life 2 deathmatch\hl2mp\materials\[myFolder]
If you do not put your files in a folder, it can cause problems later on. - After (re)starting the Hammer editor in HL2 DM, you can find the created texture in the list of available textures.
Valve Developer Community, 2005 (1). "Creating Brushes",
http://developer.valvesoftware.com/wiki/Creating_Brushes
Valve Developer Community, 2005 (2). "Hammer Hotkey Reference",
http://developer.valvesoftware.com/wiki/Hammer_Hotkey_Reference
Valve Developer Community, 2005 (3). "Your First Half-Life 2: Deathmatch Room",
http://developer.valvesoftware.com/wiki/Your_First_Half-Life_2:_Deathmatch_Room
Zombie, 2005. "Optimization",
http://www.student.kun.nl/rvanhoorn/Optimization.htm
[]